User guide
Automation
Automation prints orders by themselves. A file or an order arrives, MagLab lays it out on your template, and it prints.
Automation is part of MagLab Pro and of the free trial. With MagLab Standard you can still set everything up: jobs wait in the queue and print once you upgrade (Settings → Subscription → Upgrade to Pro).
Choose how orders arrive
| You have… | Use | Who sets it up |
|---|---|---|
| A Shopify shop | Shopify | You |
| An Etsy shop | Etsy | You |
| Files to print | A hot folder | You |
| Your own website, or another kind of shop | An order feed or webhook | Whoever built the website |
| A script or a till system | The local API | A developer |
Start with a hot folder if you’re not sure. It needs nothing but a folder.
Hot folders
A hot folder is a folder MagLab watches. Whatever you save into it is laid out and printed.
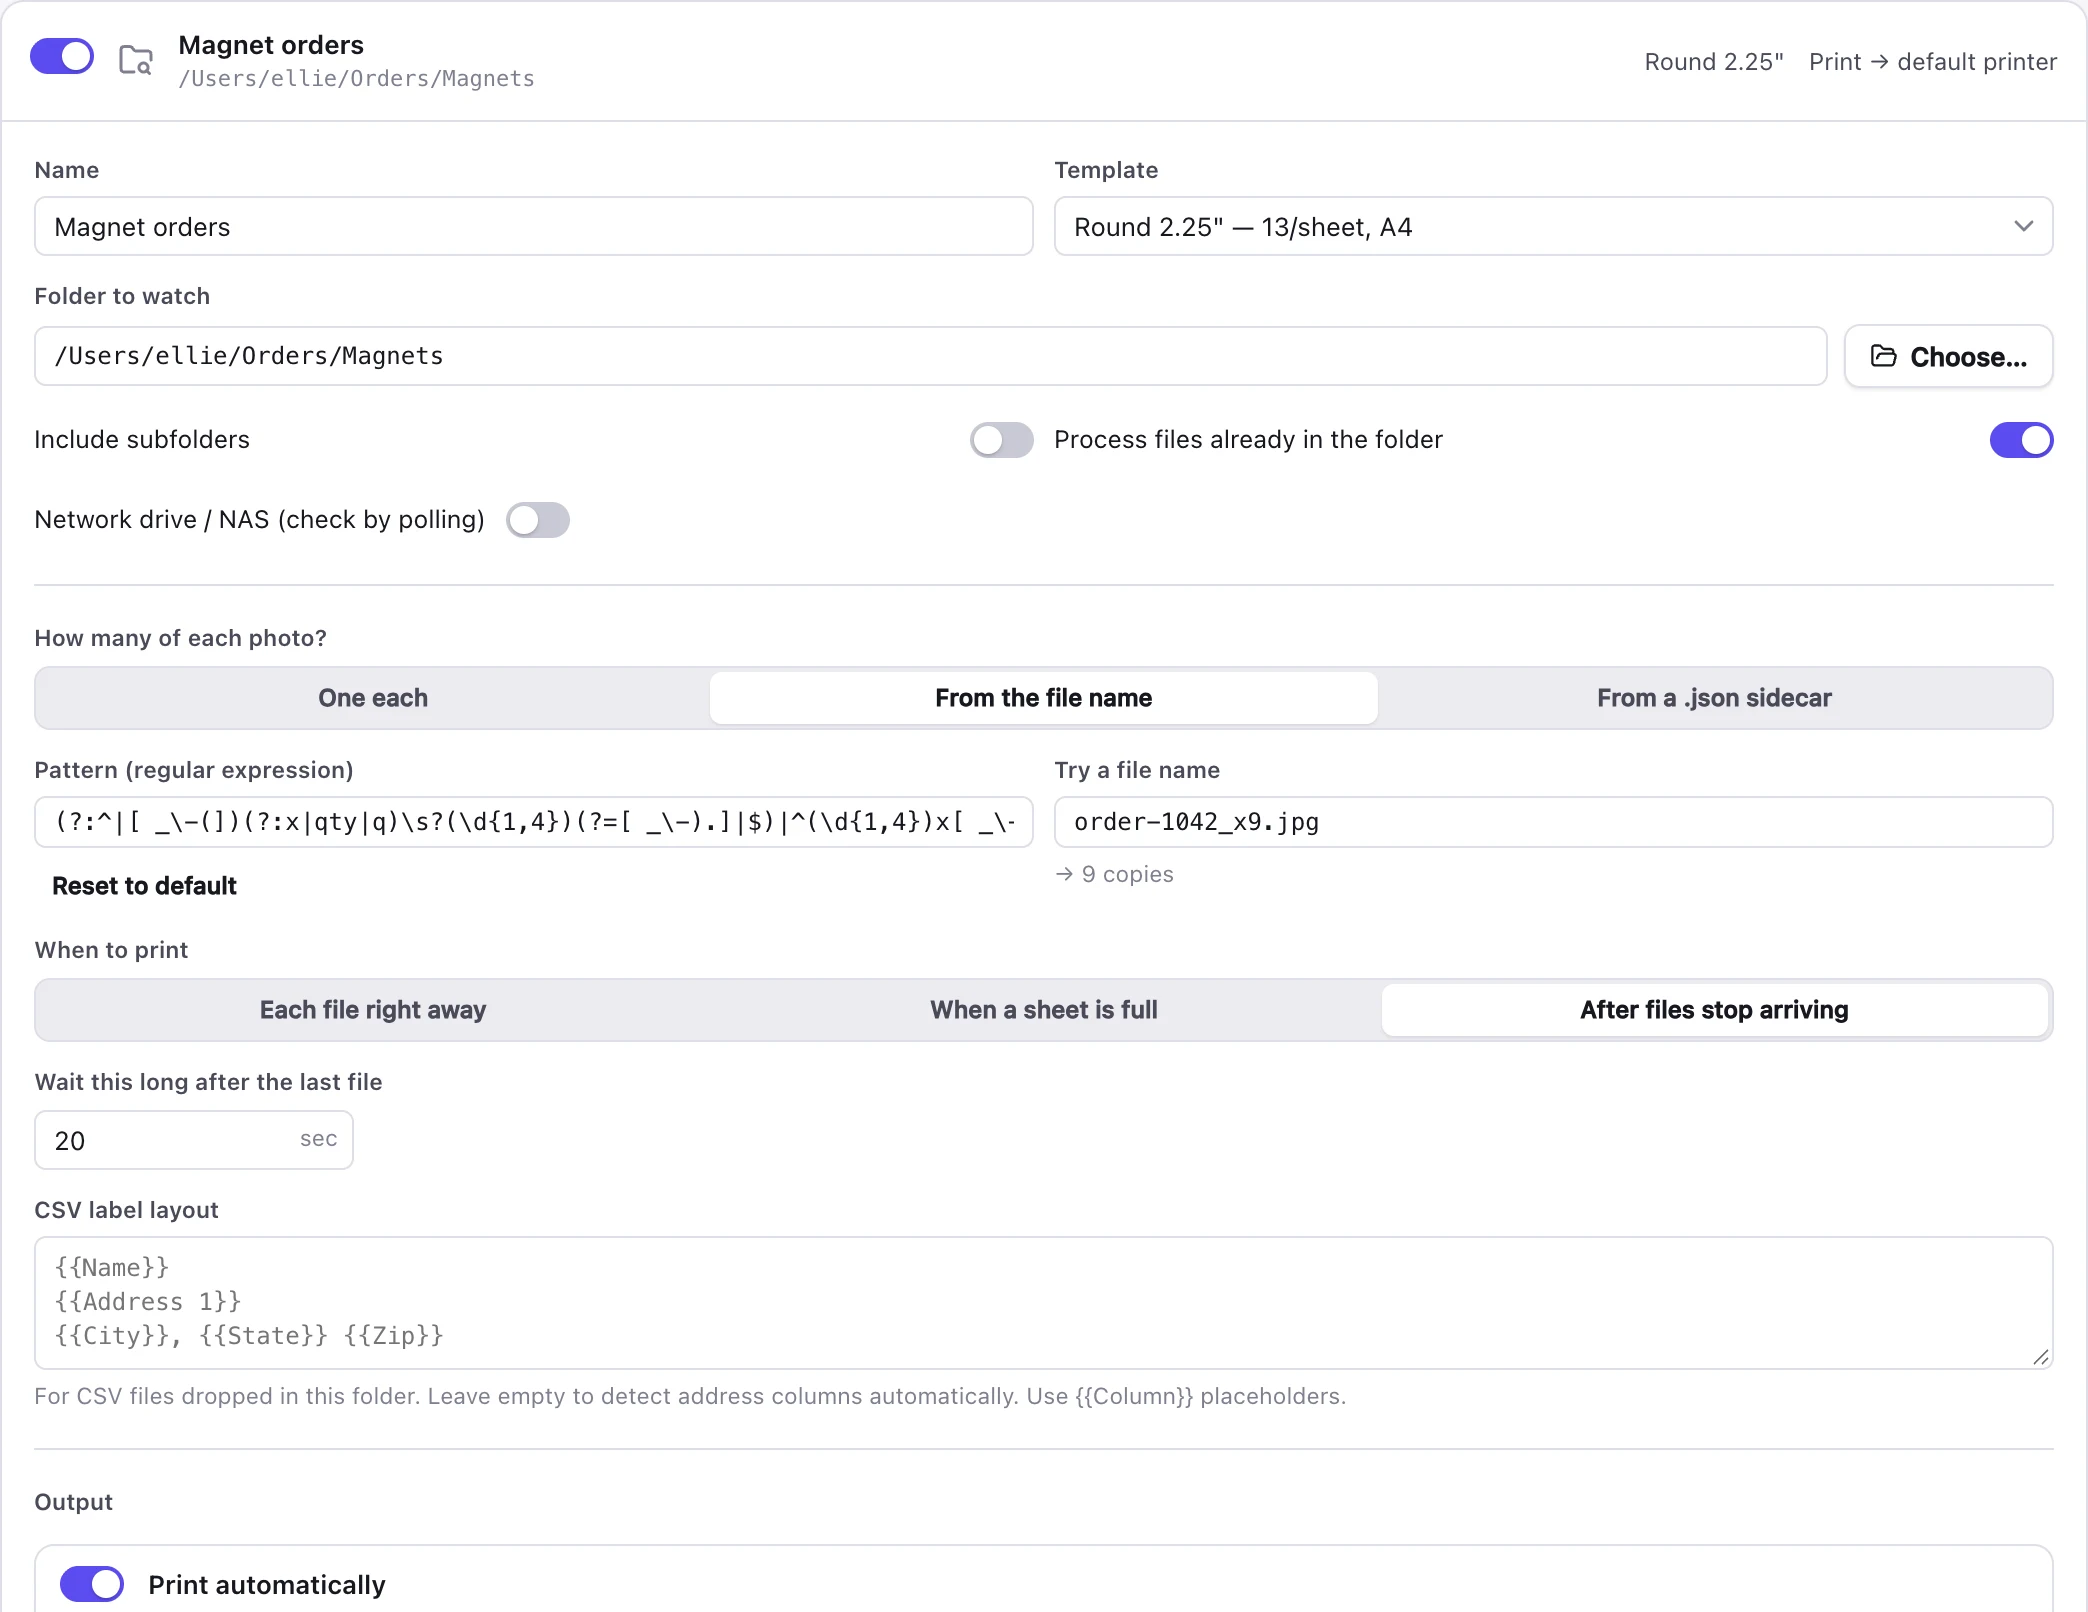
- Click Automate → Hot folders → Add hot folder.
- Choose the folder and the template.
- Choose whether to print, save a PDF copy, or both.
- Save a photo into the folder. MagLab prints it.
What you can drop in
| You drop… | MagLab… |
|---|---|
photo.jpg |
Lays out one copy. |
photo_x9.jpg |
Lays out nine, when How many of each photo? is set to From the file name. |
orders.csv |
Makes one label per row. A column called Quantity, Qty, Copies or Count sets how many of each. |
A hot folder also takes files written by a program.
Settings
- When to print: Each file right away, When a sheet is full, or After files stop arriving (best for batches).
- After printing: Move to Processed / Failed moves each file into a
ProcessedorFailedfolder inside the hot folder, sorted by date. Leave in place (remember them) leaves files where they are, and MagLab remembers which ones it has printed. - Folders on another computer or a network drive: tick Network drive / NAS (check by polling). These folders don’t always tell MagLab when a file arrives, so MagLab looks in them regularly instead.
Keep MagLab running
MagLab keeps printing with its window closed. It stays in the menu bar on a Mac, or the system tray on Windows and Linux.
For a computer that’s always ready to print, turn on Settings → Open MagLab when I log in.
The print queue
Automate → Print queue shows every job with its progress. From there you can retry or cancel a job, print it again, or open its PDF.
Each order has a coloured label for where it came from: orange for Etsy, green for Shopify, and grey for everything else.
Click an order to see every sheet and label as it will print, with its address and order details. Click a sheet to enlarge it.
If the internet connection drops, orders wait. An order whose photos can’t be downloaded stays in the queue, and MagLab tries it again by itself for about a day.
To see and print orders from your phone, see Phone.
If orders arrive but don’t print, check the badge at the top of Automate. Paused means automation is paused: click Resume.
Working hours
Working hours choose when automation may print. Use them to keep the printer quiet while you sleep, or to print the day’s orders overnight.
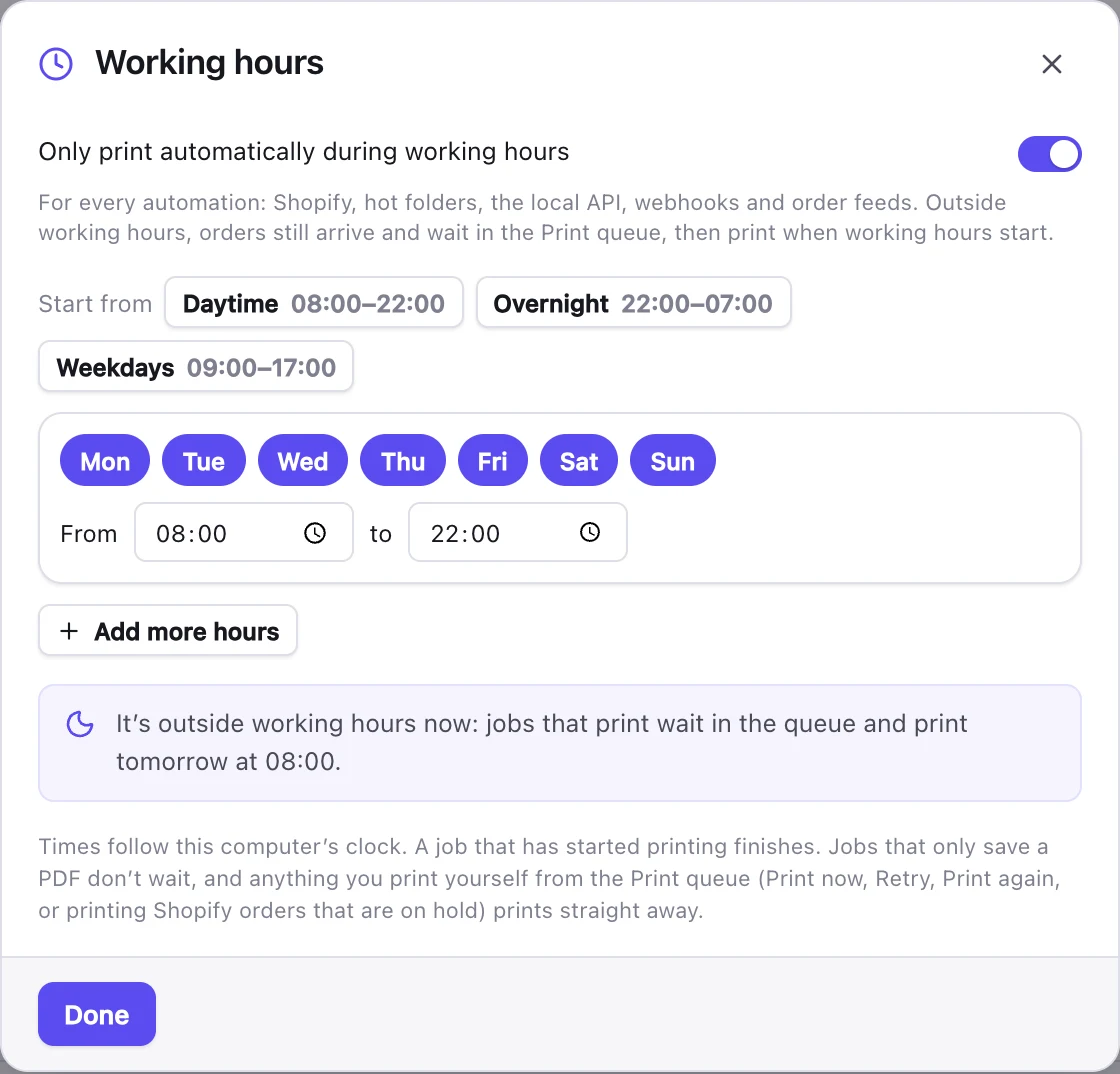
- Click Working hours at the top of Automate.
- Switch on Only print automatically during working hours.
- Choose the days and times. Start from fills in common hours: Daytime (08:00–22:00 every day), Overnight (22:00–07:00 every night) or Weekdays (09:00–17:00, Monday to Friday).
Add more hours sets different hours on some days, such as 10:00–14:00 on Saturdays, or a break in the middle of the day.
What happens outside working hours
- Orders still arrive, and wait in the Print queue. The queue says how many are waiting and when they’ll print.
- When working hours start, they print in the order they arrived.
- A job that has started printing finishes, even if working hours end.
- Jobs that only save a PDF don’t wait.
- Anything you print yourself from the Print queue prints straight away: Print now, Retry and Print again.
Working hours apply to every kind of automation, including Shopify and Etsy.
Hours past midnight
Hours that end earlier than they start, such as 22:00–07:00, run into the next morning. The days you tick are the days they start on, so Friday 22:00–07:00 ends on Saturday morning. Times follow your computer’s clock, including summer time.
Back up or move your settings
Automate → Backup → Export settings… saves a .mlauto file. It holds every automation setting, plus the templates, product designs and saved products they use.
The file also contains the passwords and keys from those settings, including Shopify Client secrets and Etsy Shared secrets. Keep it private.
Backup → Import settings… loads the file on this or another computer.
- It replaces the current automation settings and adds any templates you don’t have yet.
- Everything arrives switched off. Check the printer names and folder paths, then switch each one on.
- Approve each Etsy shop again on the new computer, with Edit connection.
- You choose whether order feeds and webhooks remember the orders they’ve already received. Keep them when restoring a computer. Drop them if the file comes from a computer you were only testing on.
You don’t need this to install a new version of MagLab. Settings survive updates.
Raspberry Pi print station
A Raspberry Pi next to your printer makes a small, always-on, low-power print station for hot folders, the local API and order feeds. You need to be comfortable with a terminal.
You need:
- A Raspberry Pi 5 with 4–8 GB of memory. A Pi 4 with 4 GB works, but more slowly.
- 64-bit Raspberry Pi OS with desktop (Bookworm or newer).
- A printer that works on Linux. Most Epson EcoTank printers work with the standard
printer-driver-escprpackage.
Set it up:
-
Add your printer in Preferences → Print Settings → Add. Print a test page from there first.
-
Install MagLab. Download the Raspberry Pi installer (the file ending
_arm64.deb) from MagLab’s download page. Open a terminal in the folder you saved it to and run:sudo apt install ./MagLab_*_arm64.deb -
Calibrate the printer from the Pi, the same as on a computer. Calibration belongs to the computer that prints.
-
Set up automation, then turn on Settings → Open MagLab when I log in.
-
Turn on Low power mode in Settings → Startup & background, then restart MagLab. Screens are plainer and MagLab uses less memory. Prints come out the same.
Run it without a screen:
- In Raspberry Pi Configuration → System, set Boot to To desktop and turn Auto login on. MagLab needs the desktop running to prepare sheets, even with no screen attached.
- Turn on VNC under Interfaces, so you can see and control the Pi from your Mac or PC with a VNC viewer app.
Send it work from other computers: share the Pi’s hot folder over your network (Raspberry Pi OS can do this with Samba) and tick Network drive / NAS (check by polling) for it. Or send jobs to the Pi’s local API with Allow other computers on my network turned on.
A Pi takes a few seconds to prepare each sheet rather than a fraction of a second. That’s fine for automated printing, but designing templates is quicker on a computer. To set everything up on a faster computer first, export your settings and import them on the Pi.
If MagLab opens to a blank window
On Linux, start it once from a terminal with:
WEBKIT_DISABLE_COMPOSITING_MODE=1 maglabIf that fixes it, please tell us your board and system version.
For developers: orders from a website or program
The rest of this page is for whoever builds your website or writes your scripts. The API reference has the full details.
Order feeds
MagLab asks your website for new orders every couple of minutes (you choose how often) and prints them. After printing an order, MagLab can tell your website it’s done.
Nothing on the internet needs to reach your computer, so this is the simplest way to connect a website you control.
Incoming webhooks
Your shop (WooCommerce and others) sends each new order to MagLab. You tell MagLab which details of the order hold the photo, quantity and text.
- An order with nothing to print, such as one for a product without photos, is skipped and noted in Activity.
- If the shop sends the same order twice, it prints only once. To test with the same order again, click Forget received orders in the webhook’s settings.
The local API
Other programs send print jobs to MagLab. Turn it on in Automate → Local API.
A program can mark a job to print straight away, even outside working hours, such as an order from a customer waiting in the shop.
Files a program can drop in a hot folder
| You drop… | MagLab… |
|---|---|
photo.jpg and photo.json |
Reads the quantity and text from the .json file, such as {"quantity": 6, "text": "Max"}, when How many of each photo? is set to From a .json sidecar. |
order-1042.json |
Prints a whole job written in the API’s job format. It can name a saved product: {"product": "Cat stickers", "quantity": 2}. |
Letting other computers reach MagLab
Webhooks and the local API only work when the sender can reach MagLab. Order feeds don’t need this.
- On your own network: turn on Allow other computers on my network in Automate → Local API.
- From the internet, such as Zapier or Make: you also need a tunnel. This is a service, such as Cloudflare Tunnel or ngrok, that gives MagLab a secure public web address.
Print an address label with each order
In an order feed or incoming webhook, Also print for each order adds more documents, such as an address label on a label printer alongside the photo sheet on your inkjet.
For a Shopify shop, see Address labels instead.
An order prints completely or not at all. MagLab downloads and lays out everything first, and checks that every printer is there before printing anything. If a printer stops part-way, Retry prints only what didn’t print.
If photo downloads are refused
If downloads fail with Download refused (403), the site hosting the photos is probably blocking downloads that don’t come from your shop. Add a header under Photo download headers, for example Referer: https://your-shop.example/.
Next
- Shopify and Etsy: print your shop’s orders by themselves.
- Phone: see and print your orders from your phone.
- Help: licence keys, updates and fixes for common problems.
- API reference: for whoever connects a website or program to MagLab.