User guide
Shopify
MagLab can print your Shopify orders by itself. It checks your shop for paid orders every minute and prints your customers’ photos, or your own designs for products you sell ready-made.
Orders go straight from Shopify to your computer. Orders placed while your computer was off print when MagLab starts again.
This needs MagLab Pro or the free trial. Selling on Etsy? See Etsy. On this page, a product is a product in your Shopify shop, and a saved product is a layout you saved in MagLab.
Before you start
- For products made from customers’ photos: you need a photo upload app on your product page. Choose one that saves a link to each photo on the order. Ask the app’s support team if you’re not sure.
- For products with ready-made designs: you only need the design files.
Step 1: make an app for MagLab in Shopify
You do this once for each shop. It gives MagLab permission to read your orders.
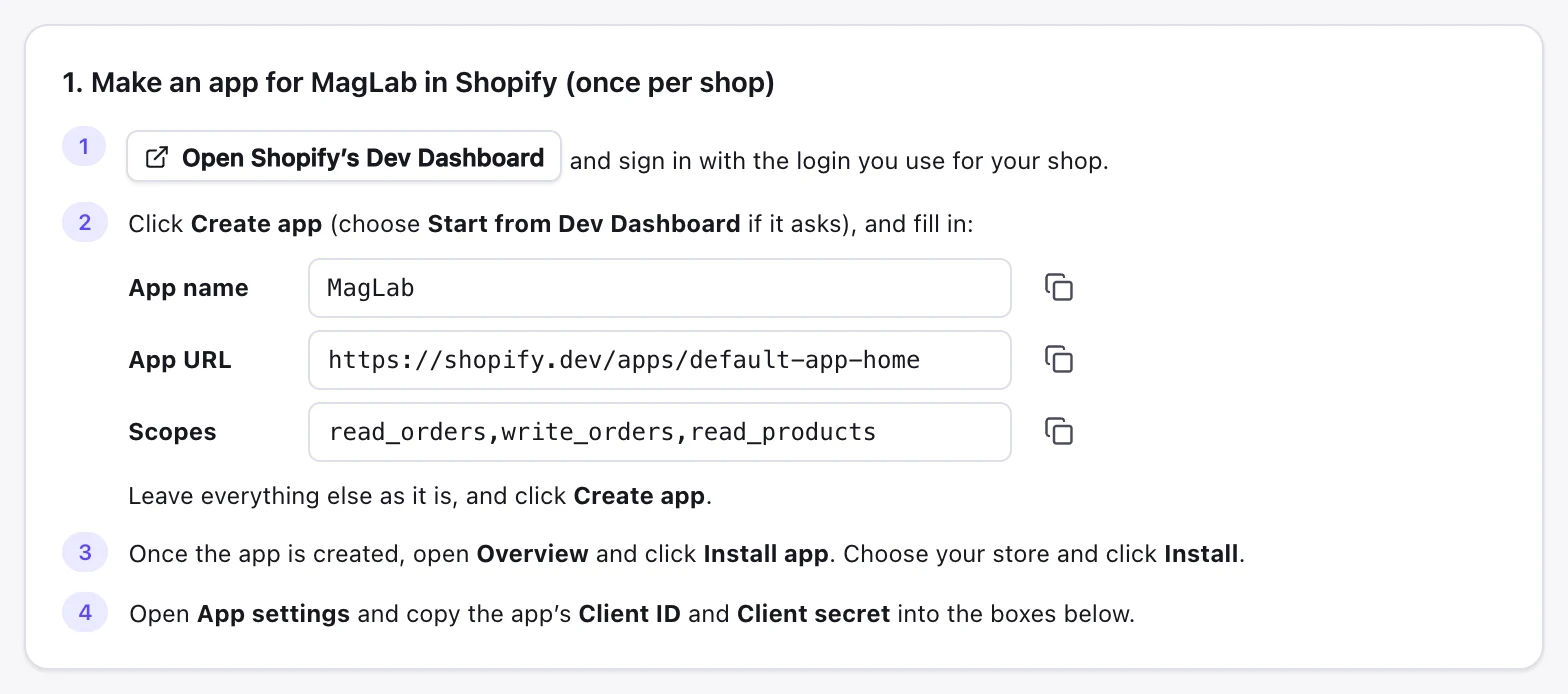
Open Automate → Shopify in MagLab. The same steps are on that screen, with a copy button for each value. Click Open Shopify’s Dev Dashboard, then:
-
Sign in with the login you use for your shop.
-
Click Create app. If it asks, choose Start from Dev Dashboard.
-
Fill in these three fields. MagLab shows each one with a copy button. Leave everything else as it is.
Field Value App name MagLabApp URL https://shopify.dev/apps/default-app-homeScopes read_orders,write_orders,read_products -
Click Create app.
-
Open Overview and click Install app. Choose your store and click Install.
-
Open App settings and copy the app’s Client ID and Client secret.
The App URL is Shopify’s own default page for apps like this. MagLab never opens inside Shopify. Scopes are the permissions the app asks for: to read your orders, mark them as printed, and read your product list.
Step 2: connect your shop
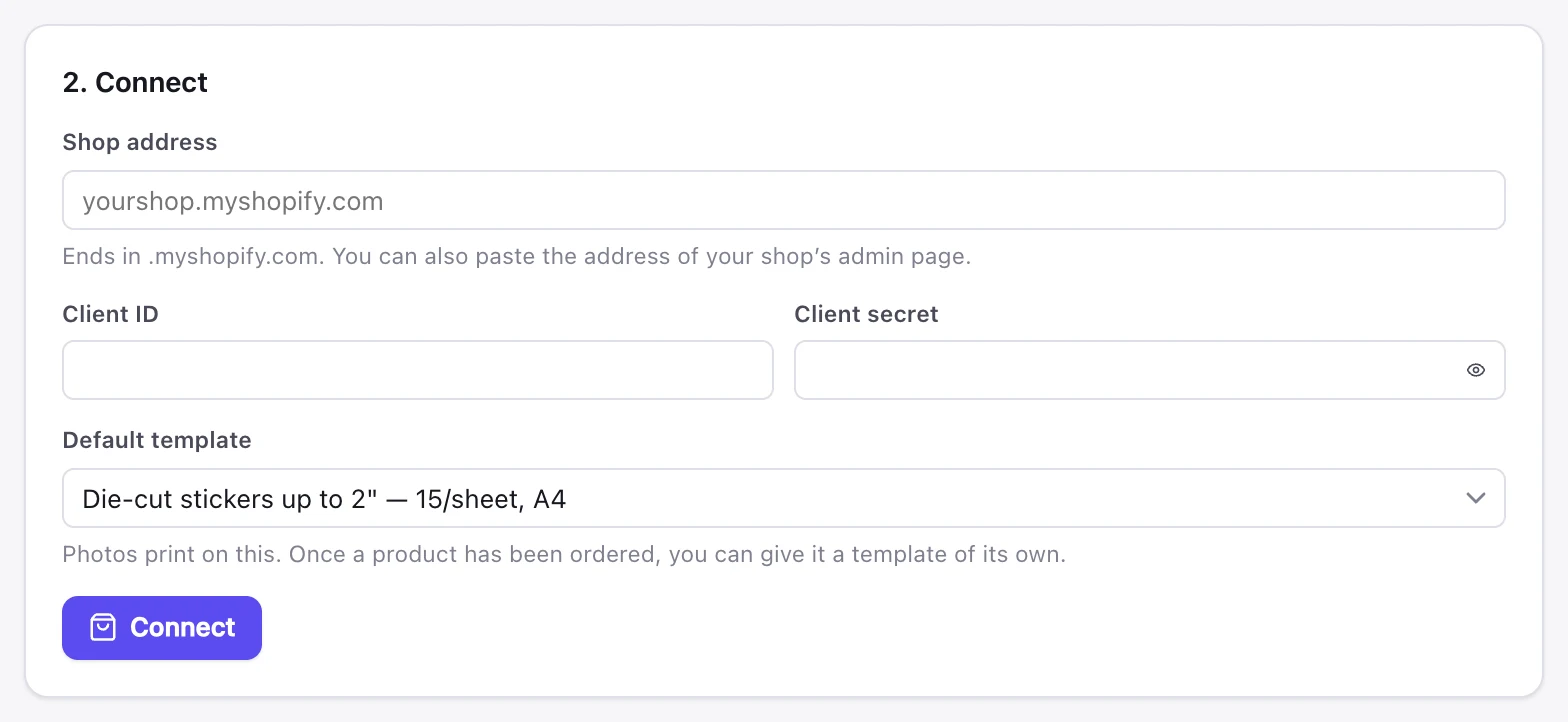
Back in Automate → Shopify:
- Enter your shop’s address. It ends in
.myshopify.com. - Paste the Client ID and Client secret.
- Choose the Default template your photos print on.
- Click Connect.
What happens to orders
Every paid order with photos or a design comes into Automate → Print queue.
- New orders wait on hold at first. A new shop starts with Print automatically off, so your printer doesn’t start without warning. Print orders one at a time, or click Print all. You can still choose the shop’s printer while it’s off: orders you print yourself go to it.
- To print orders by themselves, switch on Print automatically in the shop’s Output. Everything on hold prints, and every order after that prints by itself.
- Older orders wait as backlog. These are paid orders from before you connected that haven’t been sent yet. They never print by themselves. Print or skip each one, or use Print all or Skip all.
- One Print all for everything waiting. The banner at the top of the Print queue counts the orders in the backlog, on hold and waiting to share sheets together, and Print all prints them all at once. When the shop shares sheets, they share the same sheets, and each gets its address label. Skip all skips the backlog and on-hold orders, and leaves orders sharing sheets to print. The same Print all is at the top of the phone page.
- Printed orders get the tag
maglab-printedin Shopify, so you can see what has printed and nothing prints twice.
Each photo prints once for every pack bought. Check now looks for new orders straight away.
Choose what each product prints
Each product appears under Templates after its first order. It prints on the Default template until you give it a template of its own, or set it to Don’t print.
To set products up before they’re ordered, click Sync products from Shopify. It lists every active product in your shop. Syncing again adds new products and keeps your settings for the rest. To add just one, type its name under Add a product, exactly as it appears in Shopify.
Products with your own designs
For products you sell ready-made, click Choose… in the product’s Design column and pick one of these:
- A picture: one design file. Each one ordered prints the design on the product’s template.
- A saved product: each one ordered prints the saved product’s whole sheets, on the saved product’s own template.
If a customer uploads photos for that product, their photos print instead.
Variants
To give sizes or colours their own design or template, click Set up a variant under the product. A variant set to Same as the product uses the product’s template and design.
Good to know
- Products and variants are recognised by name. A renamed product appears as a new one.
- Changing the default template changes every product still set to it.
- Products without photos or a design, such as gift cards, are never printed.
Print several orders on the same sheets
Switch on Print several orders on the same sheets so sheets aren’t printed half empty. Orders then wait in the Print queue and print together:
- When a sheet is full: switch on Print as soon as there’s a full sheet.
- At set times: add them under Print everything waiting at, such as 16:00 before the post goes.
- When you say: click Print now.
You can use full sheets and set times together. Full sheets print as they fill, and whatever is left prints at the set time.
Keep each order on one sheet
Keep each order on one sheet is on to start with. An order that doesn’t fit in the space left on a sheet starts a new sheet, so a set of magnets never starts on one sheet and ends on the next. A smaller order that fits fills the gap; if none does, the space is left empty. This can use a little more paper.
An order bigger than a whole sheet starts on a new sheet, and any orders that fit can fill the space left on its last one.
Switch it off to fill every space, letting an order start at the end of one sheet and finish on the next.
Packed sticker sheets (die-cut stickers placed by their outlines) have no set number of shapes, so on those an order can always run onto the next sheet.
Telling orders apart
To place order numbers yourself, add text by every shape with {$order} or {$reference} in the template’s Pictures, text & lines. On a shared sheet, each shape shows its own order’s number, and {$reference} at the top of the sheet lists the orders on that sheet.
If the template doesn’t show order numbers by its shapes, MagLab prints each shape’s order number next to it. If there’s no gap between shapes, the sheet lists its orders in its widest margin instead.
Split shared sheets back into orders
To print orders from shared sheets again one by one, click Split back into orders (the ungroup button) on the shared job in the Print queue. Each order goes back on hold by itself, with its photos, crops, copies and address label as they were on the shared sheets, and the shared job is removed. Print them one at a time or with Print all. If the shop still shares sheets, Print all shares them again.
If the shared sheets have printed, MagLab asks which orders need printing again. Only the ones you tick go back on hold. The others become separate orders that stay printed, and packed if the shared job was.
Mark an order as printed
If you printed an order some other way, click Mark as printed (the double tick) next to it in the Print queue, or tap it on the phone page. It moves to Printed without printing, and a Shopify order is marked as printed in Shopify. You can still print it with Print again.
Undo your changes to an order
To undo crops, replaced photos and changed copies on an order that hasn’t printed yet, click Reset to the order as placed (the undo button) next to it. MagLab reads the order from your shop again and rebuilds it with the shop’s current settings.
Good to know
- With Keep each order on one sheet off and full sheets only, an order can be split. The rest of it prints with the next full sheet. With it on, an order waits until its whole sheet is full.
- An order is marked as printed in Shopify once all of it has printed.
- Saved products are whole sheets, so they print without waiting for other orders.
- Sheets that are ready outside working hours wait until working hours start.
Address labels
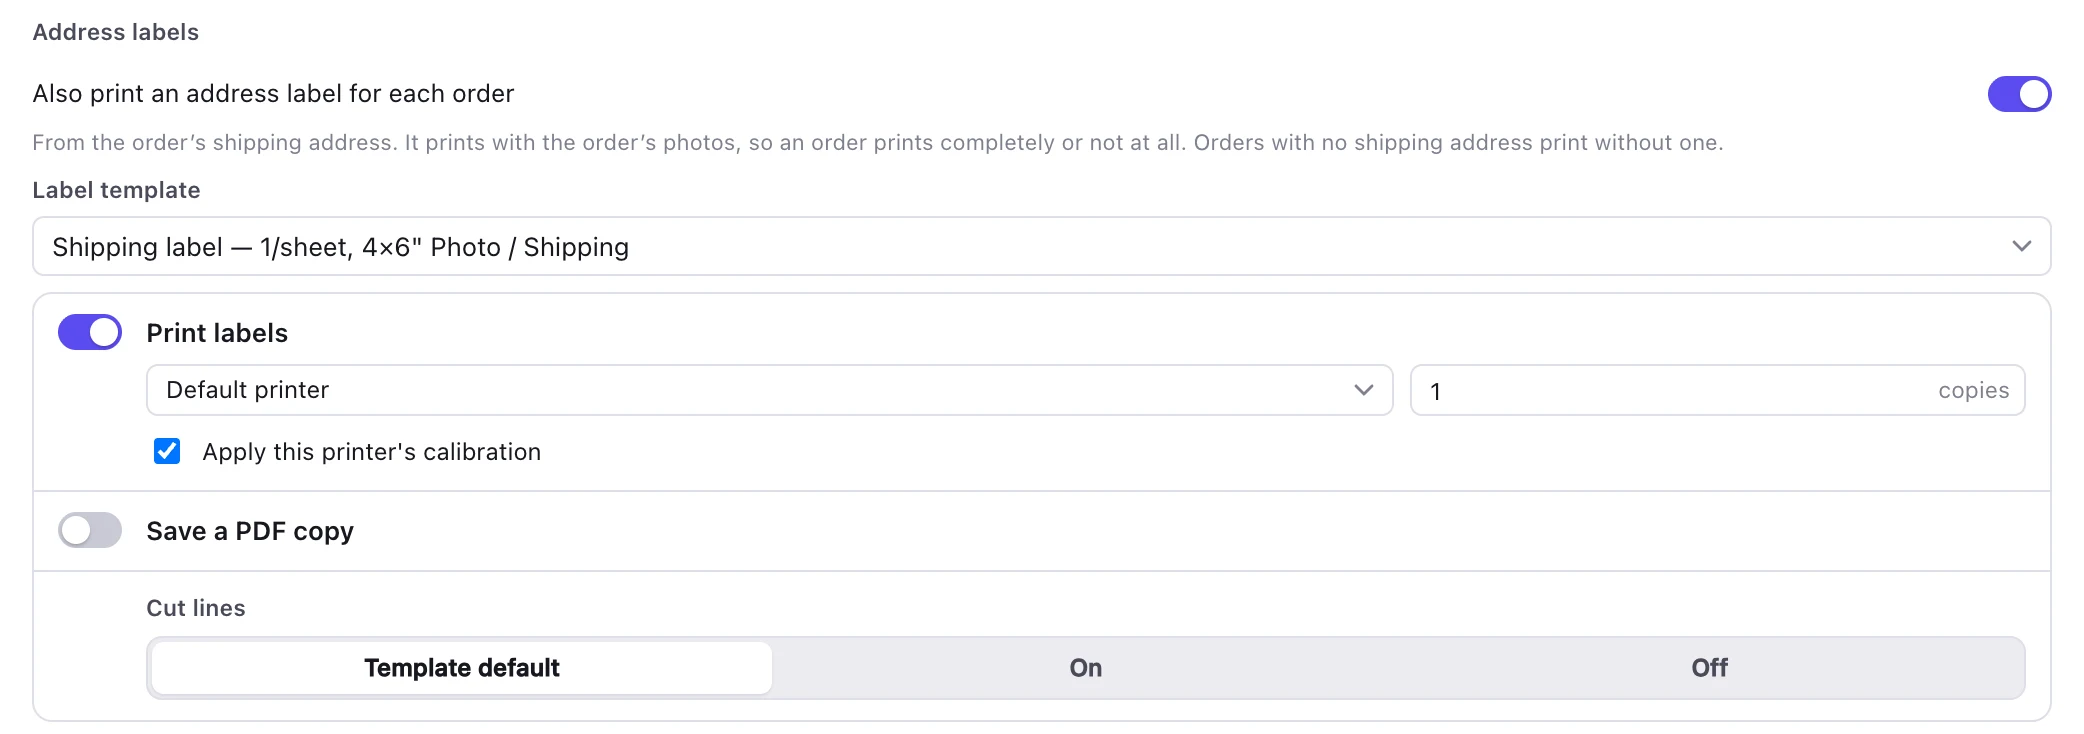
- Switch on Also print an address label for each order.
- Choose a label template.
- Choose whether labels print, save as a PDF in a folder you choose, or both.
Labels can go to a different printer from your photos, such as a label printer.
- Each label comes from the order’s shipping address and prints with the order’s photos. An order prints completely or not at all.
- Orders with no shipping address, such as collections, print without a label.
- When orders share sheets, each order’s label goes to the printer as a job of its own, named after the order, so a label printer gets them one at a time. Labels on sheets of several labels, such as A4 address label sheets, share a sheet instead.
- To check labels before printing any, save PDFs with printing switched off.
- When an order is split across sheets, its label prints with its last part.
Change the connection or add a shop
- Edit connection changes the shop address, Client ID or Client secret, for example to fix a typo. MagLab checks them with Shopify before saving. The Client secret shows as dots. Click the eye next to it to see it.
- Connect another shop adds more shops, each with its own templates and printer. Make a MagLab app in Shopify for each shop.
The Client secret is kept in MagLab’s settings and in settings backups.
If something goes wrong
If an error stays, it ends with Shopify’s own words and a request id. Shopify support can use that code to look the error up.
| MagLab says | Fix |
|---|---|
| It doesn’t have permission, or can’t mark orders as printed | Shopify hasn’t granted the app’s scopes yet. Reinstall the app. |
| Shopify won’t let this app connect | Make sure you created the app while signed in as the shop’s owner, and installed it on the same shop. |
| The app isn’t approved to read orders | Reinstall the app. An app you make for your own shop is approved automatically. |
| Shopify didn’t share shipping addresses | Check your Shopify plan. Shopify may only share customers’ names and addresses with apps like this on the Grow plan or higher. On Grow or higher, reinstall the app. |
| Enter the Client secret again | Copy it from App settings in the Dev Dashboard and paste it in with Edit connection. This can happen to shops connected with an old version of MagLab. |
Reinstall the app
Shopify only grants changed scopes on a fresh install.
- In the Dev Dashboard, check that Scopes says
read_orders,write_orders,read_productsand click Release. - In your Shopify admin, open Settings → Apps and uninstall the MagLab app.
- Install it again from the Dev Dashboard.
- In MagLab, click Connect or Check now.
read_products is only needed for Sync products from Shopify. Orders print without it.
Next
- Automation: working hours, the print queue and backing up your settings.
- Phone: see and print your orders from your phone.
- Help: licence keys, updates and fixes for common problems.